Here's the pin I used
I was making crock pot teriyaki chicken (review to follow), and it called for a half cup of onion. So then I had half an onion left and nothing to do, since dinner was cooking itself. I remember my mom mentioning she had made onion rings from pinterest the other day, and how she really loved them but it was a lot of effort.
The truth: It's not a lot of effort and it's way worth it. If that's the only thing you're doing. If you're like my momma, and you're trying to make burgers, fixins, and onion rings, well...yeah. It's hectic.
I haphazardly sliced my onion, try to aim for uniform slice thickness, unlike moi.
I used italian bread crumbs instead of making my own. The only thing I would suggest is adding more salt and pepper, maybe even some red pepper flakes? Mmmm.
I used two baking racks to hold the rings, I put some paper towel underneath to catch any access batter from messing up the counter.
When it came down to frying, it was painless. I used my electric deep fryer and a pair of chopsticks to add the rings in, flip them after a minute or two, and let them cook on that side too. I like extra crunchy, so I actually dunked them under the oil for a few seconds as well to get a last second crunch in there. I set them down on a few folded up paper towels.
It was so delicious, and such a quick snack. We devoured them while doing homework during a lazy afternoon. I put the ones we didn't eat in some tupperware and I'll set 'em under the broiler when I need a snack.

Showing posts with label delicious. Show all posts
Showing posts with label delicious. Show all posts
Friday, October 10, 2014

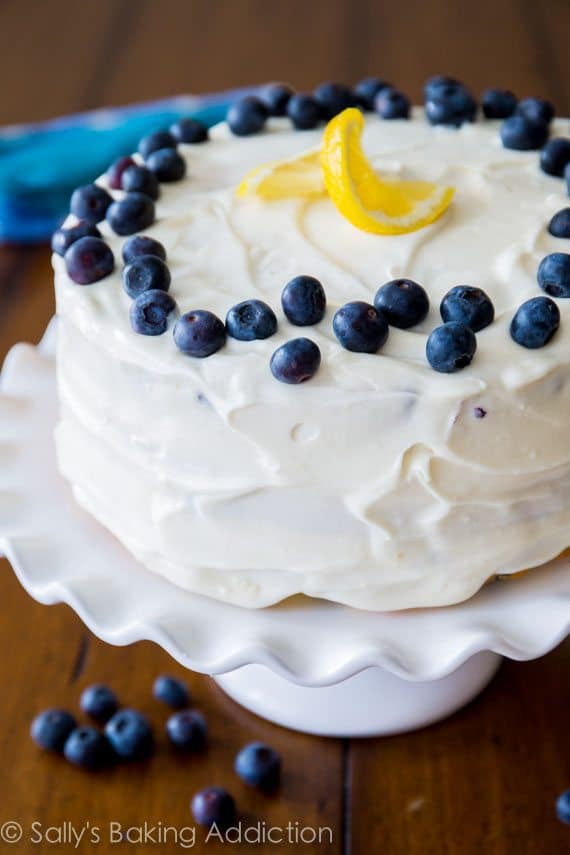
Pinterest: Lemon Blueberry Layer Cake
 |
| Her cake |
 |
| My cake |
Let me tell you somethin'. A little secret between friends. Before this day, August 17th, 2014, I had never baked a cake from scratch. Ever.
Let me tell you somethin' else. This was the easiest thing I've ever made. Obviously, my lighting left a lot to be desired, as did the height. I didn't want a sky scraper of a cake. I'd done that before. It makes cutting, serving and eating impossible and I'm just not a fan. Kapeche? Ka-peesh? Whatever. You get me.
From start to finish, I had zero issues with this. Oh, except that my hand mixer broke like, RIGHT as I finished making the icing, but frankly that wasn't her fault.
I highly recommend this, it was a huge hit with everyone (except boyfriend, he isn't a lemon guy).
Pinterest: Biscuit Donuts
First off, Here's the pin I tried.
Second off, I love donuts.
Third off, boyfriend loves donuts.
So I thought to myself, "Self, you're totally capable of doing this."
Famous last words.
It'd started off so simple, popping a hole in the middle of each biscuit. That's where the simplicity ended and the horror began.
I will add, that at this point I did not have a deep fryer. I had a pot full of oil. Very. Very. Hot oil.
Possibly too hot, because, like the average twenty-something, I do not own a thermometer.
So there I am, with raw biscuit donuts, a pot of hot oil and a head full of dreams.
Next thing I know, I have almost burned donuts, an evil cauldron of hissing, spitting lava oil, and burn wounds on my arms and hands.
The insides were still raw.
The icing, at least, was good, so I will take that from the recipe.
I might try this again now that I have an electric deep fryer with temperature control. Or I might just run down to the Krispy Kreme when the Hot light is on ;)
Second off, I love donuts.
Third off, boyfriend loves donuts.
So I thought to myself, "Self, you're totally capable of doing this."
Famous last words.
It'd started off so simple, popping a hole in the middle of each biscuit. That's where the simplicity ended and the horror began.
I will add, that at this point I did not have a deep fryer. I had a pot full of oil. Very. Very. Hot oil.
Possibly too hot, because, like the average twenty-something, I do not own a thermometer.
So there I am, with raw biscuit donuts, a pot of hot oil and a head full of dreams.
Next thing I know, I have almost burned donuts, an evil cauldron of hissing, spitting lava oil, and burn wounds on my arms and hands.
The insides were still raw.
The icing, at least, was good, so I will take that from the recipe.
I might try this again now that I have an electric deep fryer with temperature control. Or I might just run down to the Krispy Kreme when the Hot light is on ;)
 |
| What mine looked like |
 |
| What hers looked like |
New series coming up!
So, I have a confession to make.
Don't be alarmed.
I have a Pinterest addiction.
But before it was harmless. I would surf Pinterest and pin and make boards and like things. Harmless fun.
But now...I have to make the things I pin. And sometimes it works out, sometimes it doesn't! So now I will post the pins I have tried, and what happened. That way I hope to save you from the grief of trying to recreate a pin for dinner and having to order pizza after all that hard work.
I'm going to post a few today that I have already tried, the ones that I try next will be more detailed and have pictures of the processes and whatnot.
TTFN, Tata for now!
Don't be alarmed.
I have a Pinterest addiction.
But before it was harmless. I would surf Pinterest and pin and make boards and like things. Harmless fun.
But now...I have to make the things I pin. And sometimes it works out, sometimes it doesn't! So now I will post the pins I have tried, and what happened. That way I hope to save you from the grief of trying to recreate a pin for dinner and having to order pizza after all that hard work.
I'm going to post a few today that I have already tried, the ones that I try next will be more detailed and have pictures of the processes and whatnot.
TTFN, Tata for now!
Tuesday, February 11, 2014
Perfect Pancakes!
Happy Caturday!

This morning I made pancakes, and oh man. So. Good.
So let's get started!
We'll need the following..


Once the butter and sugar have a chance to start melting down, add in about 1/2 a tablespoon of cinnamon. Keep stirring and cooking until the bananas are nice and coated, and the sauce is a little thick. Put in a bowl and set aside.
Now let's get out that bowl and whisk.


This morning I made pancakes, and oh man. So. Good.
So let's get started!


We'll need the following..
- 1 or 2 bananas
- 5-6 strawberries
- 2 cups of bisquick mix
- 3/4 cups sugar (1/2 cup for whipped cream, 1/4 cup for fruit)
- 1 cup whipping cream
- 1 tablespoon of butter
- 2 eggs
- 1 1/3 cups of milk
- 1/2 tablespoon cinnamon
Go ahead and stick the bowl and whisk for whipped cream in the freezer. I highly recommend this step, and a bowl with high walls. It helps the cream whip more quickly.
Go ahead and chop up your fruit. Sprinkle a tiny bit of sugar on the strawberries.


Melt a tablespoon of butter in a skillet, then toss in about 1/4 cup of sugar.
Once the butter and sugar have a chance to start melting down, add in about 1/2 a tablespoon of cinnamon. Keep stirring and cooking until the bananas are nice and coated, and the sauce is a little thick. Put in a bowl and set aside.
Now let's get out that bowl and whisk.
Add a cup of heavy whipping cream to your bowl and start whisking! Now, you can always buy whipped topping instead of making it. But it's totally not the same. Plus, the arm workout you get from whipping this stuff up MUST burn off all the calories of eating it. Duh. (if only, right?)
A stand mixer works too, but frankly by the time I get mine all set up and whatever, I could have whipped it up. Don't get discouraged if your arm starts feeling like it's dying, switch arms. Or change positions. Seriously, I am all over the kitchen when I handwhip this stuff, balancing the bowl on my leg, leaning on the counter, it gets crazy.
Once it starts getting a little thicker, add in around a half cup of sugar and keep whipping. Whip until it gets nice and fluffy and delicious looking. Now taste to make sure it wasn't somehow poisoned.
Scoop the whipped cream into another container. Go ahead, lick the whisk. I won't tell. We are in a judgement free zone right now.
Set aside in the fridge.
Now, I take a moment to wash the skillet I used for the bananas and the bowl I used for whipped cream, because I will reuse them in a second. No need to dirty up two bowls and two pans for breakfast.
Get your bowl back and mix in the bisquick, milk and two eggs. Do your best to really go through and get out those lumps. I'm telling you this out of love, because I never do it and end up poking at clumps of bisquick mix while its in the pan.


That's how I set up my station for pancakes. It's a serious operation, obviously.
Pancake mix on the left, pan set to medium low heat, big spatula, plate for pancakes, butter, and cooking spray. In between almost every pancake I re-spray the pan and after every pancake I butter it immediately.


I use a 1/2 cup measuring cup to pour my batter. That doesn't mean I pour a half cup for each pancake, I just like using it because it's a heart. Remember, no judgement.
As I pour the batter, I shake the pan back and forth to distribute the batter evenly, and probably use only a little more than a 1/4 cup of batter for each one.
The ultimate key to pancakes: Don't let your pan get too hot. You want the pancake batter to stop spreading out on it's own. It'll get a bit of a shine around the edges, and a definite edge will form. Then the bubbles. Once you start seeing bubbles pop up in your pancake, and not just the thinner edge, go ahead and flip it.


Mmmm pancakes.
Tip:
If you flip it a little too early, it'll do something like this:
Not to worry. Let that splatter cook a little bit, then take your spatula and work it around the edge of the pancake.
You can just push it aside, and no one will be the wiser that you flipped premature. ;)
Welcome to my pancake stacking station.
Whipped cream, caramelized cinnamon bananas, strawberries, syrup, and, well, pancakes.
Mmmm. I like to work in layers. Pancake, whipped cream, fruit, repeat.
I don't use syrup on my pancakes when I make them like this, but boyfriend is alllll for it.
He told me these pancakes are so good I should open an Ihop! Not to shabby for a Tuesday ;)
Good luck and happy eating!
xoxo
Thursday, February 6, 2014
Healthy Snacking: Oven baked Kale Chips
If you were to ask any adult from my childhood, they would all laugh and tell you the same thing.
I hate vegetables.
After graduating High School and realizing that I was a wee bit on the chunky side, I decided to try and change my attitude.
Try.
I still hate most vegetables. Lettuce? Fo'getta'bout it. Celery? Yeah no. Cauliflower? According to my boyfriend, it's like lettuce and broccoli had a baby. That sounds like an abomination that needs to be stopped.
Somewhere along the line, I learned I can tolerate spinach as long as it's raw, and I can handle kale in smoothies. Since moving out, I have relinquished ownership of my blender to my family, so smoothies are out. I needed to find a new, healthy alternative to my snacking.
Kale chips!
So first thing's first. You're gonna need Kale.

I got this from the produce section, it cost me about $1.50 or something like that. It actually came with more, but that was like two batches of chips ago.
As you can see, kale is leafy with a big stem. The leaves are thin and bitter, the stalk is hard and very tough to chew.
Preheat your oven to 275 degrees Fahrenheit

Get out your cutting board and a sharp knife.
Just slice each side along the stalk. Pretty easy stuff, minimal knife skills required.
You can just toss the stalk in the trash, or if you're environmental and whatnot, a compost pile.

Here's where you want some consistency. Pick what size you want your chips to be, and try and get each one roughly the same size. If you have some tiny ones and some huge ones, they'll crisp at different rates. I just tear mine up by hand and toss 'em into a bowl.
Now's the fun part. Seasoning! I usually stick with three: Salt, Pepper, and Garlic Powder.

Before you just start dumping seasoning on top of your kale, add a bit of olive oil. You want JUST ENOUGH to lightly coat each leaf without drowning them. If they're too wet, they won't crisp right.
Then the seasoning. Kale is pretty bitter, but if you salt it enough, it takes away most of the bite. Then I pepper it, maybe about a teaspoon of pepper. MAYBE. I never measure, so don't just dump a teaspoon of pepper in there please. And then I sprinkle on some of the magic that is garlic powder. Just enough to coat each leaf.
Give it a toss with your fingers, gently enough not to smash and bruise the leaves, but enough to really mix it all up.

Now, because I'm lazy, I grab some foil and put it on a baking sheet. Dump your kale on top, making sure to really spread it out. It will shrink up in the oven, but there's no reason to layer them up.

See? Nice and spread out. Now toss those puppies into the oven for 20 minutes.
If you'd like, towards the end of that time, toss some cheese on top! I usually do Parmesan if I'm going to at all.
20 minutes later...

See how much they've shrunk? And they're delicate and crispy and amazing!
I had no idea how delicate they are. They basically crumble in your mouth. It's really weird. Boyfriend is not a fan. I popped one in his mouth and before he had even chewed he just goes "No." I might have laughed a little. Okay a lot.

See all the delicious garlic, salt and pepper? Amazing.
Either eat them hot or toss 'em in a container. I baked these this morning before work, threw them in a Tupperware container and took them with me for a snack!
Good luck and happy healthy snacking!
I hate vegetables.
After graduating High School and realizing that I was a wee bit on the chunky side, I decided to try and change my attitude.
Try.
I still hate most vegetables. Lettuce? Fo'getta'bout it. Celery? Yeah no. Cauliflower? According to my boyfriend, it's like lettuce and broccoli had a baby. That sounds like an abomination that needs to be stopped.
Somewhere along the line, I learned I can tolerate spinach as long as it's raw, and I can handle kale in smoothies. Since moving out, I have relinquished ownership of my blender to my family, so smoothies are out. I needed to find a new, healthy alternative to my snacking.
Kale chips!
So first thing's first. You're gonna need Kale.
I got this from the produce section, it cost me about $1.50 or something like that. It actually came with more, but that was like two batches of chips ago.
As you can see, kale is leafy with a big stem. The leaves are thin and bitter, the stalk is hard and very tough to chew.
Preheat your oven to 275 degrees Fahrenheit
Get out your cutting board and a sharp knife.
 |
| Clearly a vegetable knife. |
Just slice each side along the stalk. Pretty easy stuff, minimal knife skills required.
You can just toss the stalk in the trash, or if you're environmental and whatnot, a compost pile.
Here's where you want some consistency. Pick what size you want your chips to be, and try and get each one roughly the same size. If you have some tiny ones and some huge ones, they'll crisp at different rates. I just tear mine up by hand and toss 'em into a bowl.
 |
| Said bowl. |
Now's the fun part. Seasoning! I usually stick with three: Salt, Pepper, and Garlic Powder.
Before you just start dumping seasoning on top of your kale, add a bit of olive oil. You want JUST ENOUGH to lightly coat each leaf without drowning them. If they're too wet, they won't crisp right.
Then the seasoning. Kale is pretty bitter, but if you salt it enough, it takes away most of the bite. Then I pepper it, maybe about a teaspoon of pepper. MAYBE. I never measure, so don't just dump a teaspoon of pepper in there please. And then I sprinkle on some of the magic that is garlic powder. Just enough to coat each leaf.
Give it a toss with your fingers, gently enough not to smash and bruise the leaves, but enough to really mix it all up.
Now, because I'm lazy, I grab some foil and put it on a baking sheet. Dump your kale on top, making sure to really spread it out. It will shrink up in the oven, but there's no reason to layer them up.
See? Nice and spread out. Now toss those puppies into the oven for 20 minutes.
If you'd like, towards the end of that time, toss some cheese on top! I usually do Parmesan if I'm going to at all.
20 minutes later...
See how much they've shrunk? And they're delicate and crispy and amazing!
I had no idea how delicate they are. They basically crumble in your mouth. It's really weird. Boyfriend is not a fan. I popped one in his mouth and before he had even chewed he just goes "No." I might have laughed a little. Okay a lot.
See all the delicious garlic, salt and pepper? Amazing.
Either eat them hot or toss 'em in a container. I baked these this morning before work, threw them in a Tupperware container and took them with me for a snack!
Good luck and happy healthy snacking!
Subscribe to:
Posts (Atom)